

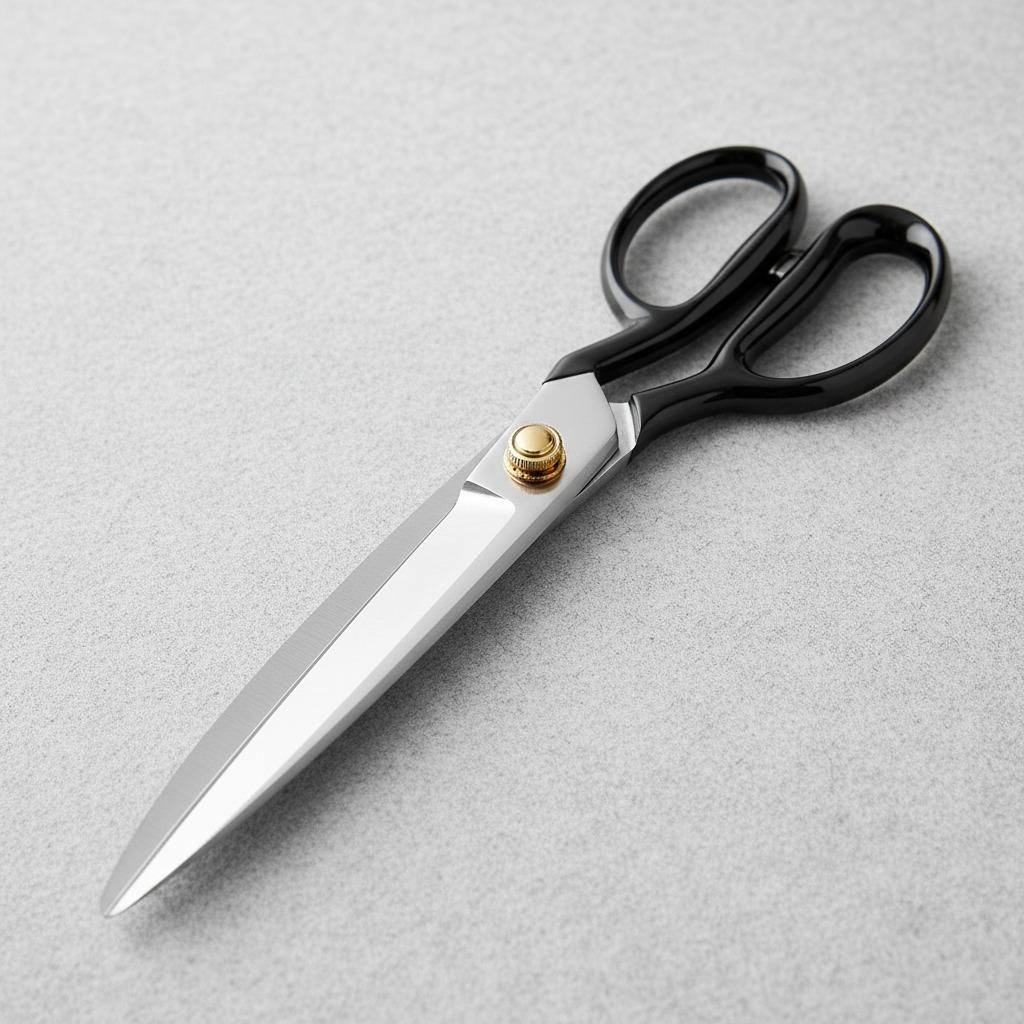
The Anatomy of a Tailor Shear: Understanding Every Part

Tailor shears, often called tailor scissors, are designed for cutting fabric cleanly and consistently. Their long blades, strong pivot, and offset handle shape make them different from general household scissors. If you sew garments, alter uniforms, cut samples, or work with craft textiles, understanding the parts of a tailor shear helps you choose the right tool and use it without damaging fabric.
This guide explains the anatomy of tailor shears in practical terms. Instead of treating scissors as a simple pair of blades, it looks at how the tips, cutting edges, pivot, shank, handles, and finger rest work together. Knowing these details can help you diagnose poor cutting, reduce hand fatigue, and decide what to ask before buying a new pair.
Key Takeaways
- Tailor shears are built for controlled fabric cutting, especially long straight cuts on a table.
- The pivot screw is central to performance because it controls blade alignment and tension.
- Offset handles help the lower blade stay close to the cutting surface, reducing fabric lift.
- Dull, dirty, or loose shears can snag fabric even if the blades look acceptable.
- Good care includes wiping the blades, protecting the edges, storing them dry, and using them only for suitable materials.
Why Tailor Shears Are Different from Ordinary Scissors
Ordinary household scissors may be useful for paper, packaging, or light tasks, but they are not ideal for fabric. Tailor shears usually have longer blades, heavier construction, and handles shaped for repeated cutting. The lower blade is commonly designed to rest close to the table so the fabric does not rise as much during the cut.
This matters because fabric shifts easily. When a tool lifts or pushes the material, pattern pieces can become inaccurate. A clean cut also reduces fraying and makes later steps, such as stitching and pressing, easier. For anyone cutting fabric regularly, the difference is not just comfort; it affects accuracy and waste.
Main Parts of a Tailor Shear
The following table summarizes the key components and what to check when evaluating a pair of tailor shears.
| Part | What It Is | What to Check |
|---|---|---|
| Tips or points | The narrow ends of the blades | They should meet neatly and allow accurate starting cuts. |
| Blades | The long metal cutting arms | Look for straight alignment, clean surfaces, and suitable length for your work. |
| Cutting edges | The sharpened inner edges | They should cut without chewing, folding, or dragging fabric. |
| Pivot screw | The joint that connects both halves | It should open smoothly without wobble or excessive stiffness. |
| Shank | The area between pivot and handles | It should feel stable and transfer hand pressure evenly. |
| Handles or bows | The thumb and finger loops | They should fit your hand without pinching or forcing the wrist. |
| Finger rest | A small support near the handle on some models | It should support control without getting in the way. |
Tips and Points: Starting the Cut Accurately
The tips, or points, are important for precision work. They help you begin a cut at a marked point, trim seam allowances, clip curves, or cut into corners. If the tips do not meet correctly, the shear may fail to cut the last few millimeters of fabric. This is frustrating when working around notches, collars, cuffs, or pattern markings.
For general dressmaking, sharp and well-aligned tips are usually more useful than very thick points. However, very fine points can be delicate, so they should not be used to pry, scrape, or cut hard non-fabric materials. If you often cut heavy textiles, ask whether the tip shape is suitable for that use.
Blades and Cutting Edges: Where Performance Happens
The blades create the length and leverage of the shear. Longer blades can cover more distance in each stroke, which is useful for cutting long straight seams. Shorter shears may be easier to control for small pieces or curved work. Many tailor shears fall into a larger size range than everyday scissors, but the best length depends on your hand size, workspace, and fabric type.
The cutting edges are the sharpened surfaces that pass against one another. When the edges are well aligned, fabric is sliced cleanly. When they are dull or damaged, the fabric may be pushed forward, pinched, or left with uneven fibers. Do not assume that a heavy pair automatically cuts well. Smooth action and edge condition matter more than weight alone.
Pivot Screw and Tension: The Center of Control
The pivot screw, sometimes called the fulcrum, is one of the most important parts of a tailor shear. It holds the two halves together and controls how closely the blades meet. If the pivot is too loose, the blades may separate slightly and fold fabric instead of cutting it. If it is too tight, the shear becomes tiring to open and close.
Some shears have an adjustable pivot, while others are fixed. If adjustability is important to you, confirm it before purchase. A practical test is to open and close the shears slowly. The motion should feel even from heel to tip, with no grinding, jumping, or side play.
Handles, Bows, and Offset Design
The handles, also called bows, determine how the tool fits your hand. Tailor shears often use an offset handle design. This means the handle is angled so the blades can remain flatter against the cutting table while your hand stays above the fabric. The result is better control and less fabric disturbance during long cuts.
Handle comfort is personal. A pair that works well for one user may pinch another user’s thumb or force the wrist into an awkward position. Before choosing, consider whether you cut right-handed or left-handed, how long your cutting sessions are, and whether the handle openings suit your fingers. If you are buying online, check return terms and ask for handle dimensions when available.
How to Choose Tailor Shears for Your Work
Selection should be based on fabric type, cutting volume, hand comfort, and maintenance expectations. A home sewist cutting cotton and lining fabric may not need the same shear as a studio cutting thick layers every day. Instead of focusing only on size or appearance, compare practical details.
- Match blade length to your cutting style: longer for straight pattern pieces, shorter for detailed control.
- Check whether the pivot is adjustable if you want to fine-tune tension over time.
- Choose handles that let your wrist stay relaxed on the cutting table.
- Ask what materials the shears are intended to cut; do not assume suitability for leather, upholstery, or multiple heavy layers.
- Confirm care instructions, sharpening options, and whether replacement parts are available.
Use and Care Tips for Longer Service
Even a good pair of tailor shears can perform poorly if it is misused. Keep fabric shears separate from paper scissors. Paper, tape, wire, and packaging can dull the cutting edges quickly. Wipe the blades after use, especially if you cut linty, treated, or adhesive-backed materials. Store the shears closed in a dry place, ideally with the edges protected.
If the pivot begins to feel rough, a small amount of suitable oil at the joint may help, but avoid over-oiling and wipe away residue so it does not transfer to fabric. When the edges become dull, use a professional sharpening service familiar with sewing shears. Poor sharpening can change the blade geometry and permanently reduce cutting quality.
Common Problems and What They Mean
If fabric folds instead of cutting, the pivot may be loose or the edges may be dull. If the tool feels stiff, the pivot may be too tight or dirty. If the tips do not cut, the blades may be misaligned or damaged near the point. If your hand hurts after only a short session, the handle fit or shear weight may not suit you.
Many cutting problems are not caused by one part alone. The anatomy works as a system: blades need alignment, the pivot needs correct tension, and the handle must let you apply force comfortably. Checking each part makes troubleshooting easier.
FAQ
What is the difference between tailor scissors and tailor shears?
In everyday use, the terms are often used interchangeably. “Shears” usually suggests a larger, stronger cutting tool intended for fabric and table work.
Can I use tailor shears to cut paper?
It is better not to. Paper can dull the cutting edges and reduce the clean slicing action needed for fabric.
How do I know if the pivot tension is correct?
The blades should open and close smoothly without wobbling. They should cut fabric from the base of the blade through the tips without folding the material.
Are longer blades always better?
No. Longer blades are helpful for long straight cuts, but smaller shears may be easier to control for tight curves, small pattern pieces, and detailed trimming.
When should tailor shears be sharpened?
Sharpen them when they begin to drag, chew, or leave uncut threads despite cleaning and correct pivot tension. Use a service that understands sewing shears.